
It's a lot to take in.
Several new folks have posted the last few days...so thought we could start a thread about the very general basics of photography. Exposure, composition (rule of thirds, etc), SLR terminology.....
These are the three major components that combined, determine 'exposure':
ISO: What is it?
You camera sensors sensitivity to light is measured by a
set of standards by the International Standards
Organization (ISO).
In general ISO with a higher sensitivity (larger number) have
more noise and do not register detail as well as
photos taken with lower sensitivity (lower number).
The numbera are usually in a series such as:
25, 50, 100, 200, 400, 800, 1600, 3200
Pretty straight forward!
Moving to the right, each number is twice the preceding number, and represents twice the sensitivity to light as the preceding
number.
There may be some intermediate steps (such as
64 or 125) on your dial.
This leaves only two things to adjust to achieve the
correct exposure while making a photograph; shutter
speed and aperture (f-stops).
Shutter speed and aperture are very important to the creative
photographic process.
Shutter Speed:
Shutter speed indicates how long the camera shutter
remains open to let light onto the film. The number
series for shutter speed is:
15, 8, 4, 2, 1, 2, 4, 8, 15, 30, 60, 125, 250, 500,
1000, 2000, 4000, 8000
This looks more complicated, but it's actually
straightforward. These numbers are whole seconds or
fractions of seconds. They aren't expressed on your
shutter speed dial as fractions to save space, so they
should read as below:
15, 8, 4, 2, 1, 1/2, 1/4, 1/8, 1/15, 1/30, 1/60,
1/125, 1/250, 1/500, 1/1000, 1/2000, 1/4000, 1/8000
Again, each number moving to the right is half the
value of the preceding number, and represents half as
much light as the preceding number.
There is an general rule many photographers use regarding shutter speeds:
Your shutter speed should be equal to, or faster than the reciprocal of
the focal length of your lens.
For example, if you are using a 200 mm lens, your
shutter speed should meet or exceed 1/200 second (I.E. 1/250 or
faster).
If not, you need to think about using a monopod, tripod, or learn very good hand-holding technique. This usually improves as you become more experienced....but you'll generally get much better results by stablilzing the camera with the tripod, monopod, sandbagging, etc.
If your subject is moving, double this shutter speed. If you
are moving (such as in a boat or plane) triple the
speed.
To be safe, weld your camera to the tripod, and buy a remote shutter realease if you are big into landscape photos, are want improve your photos in general. :yes
Just as important, using a tripod makes you slow down and
allows you to examine your composition more carefully.
Aperture (f-stops):
Aperture refers to the size of the opening inside the
lens that the light must go through to reach the sensor.
Aperture is measured in f/stops as indicated in the
series below:
1, 1.4, 2, 2.8, 4, 5.6, 8, 11, 16, 22, 32, 45
This looks tougher, but the solution is the same as
for the shutter speeds. These are actually fractions.
They should read as follows:
1/1, 1/1.4, 1/2, 1/2.8, 1/4, 1/5.6, 1/8, 1/11, 1/16,
1/22, 1/32, 1/45
The larger the number...the less light that is allowed to enter the camera. Aperture also effects 'depth of field'. But for simplicity....thats another discussion.
http://www.outdoorshooter.org
Composition:
To me this is how you SEE a scene...and how you choose to FRAME the scene in the cameras viewfinder to record the desired results you invision.
It is an important decision you must make...what you choose to include as you look at the scene...and just as importantly...what you choose to leave out.
This is a very unique and personal aspect of photography, one that can determine style, or preferences from one photographer to the next.
The simple act of choosing a composition greaty seperates photographers, and can make them unique and excellent...down to mediocre.
With a bit of experience...learning exposure will usually come...but composition must be 'seen'...and it is a huge part of the 'art' of photography.
It requires a vision and an evaluation of the scene that tends to seperate the great ones from the good ones.
There are some generally accepted rules:
http://www.outdoorshooter.org
Composition general rules continued:
Simplicity - The first and perhaps the most important guideline is simplicity.
Look for ways to give the center of interest in your pictures the most visual attention.
One way is to select uncomplicated backgrounds that will not steal attention from your subjects. ALWAYS BE AWARE OF THE BACKGROUND. This sounds very simple...but you will be suprised how many of your photos are ruined because you failed to pay attention to this simple rule.
Rule of thirds - For the most part....never center your main subject.
You can use the rule of thirds as a guide in the off-center placement of your subjects. Here's how it works.
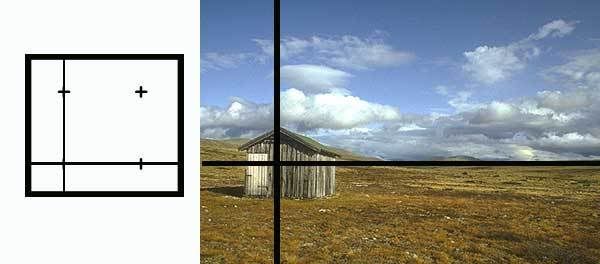
Before you snap the picture, imagine your picture area divided into thirds both horizontally and vertically. The intersections of these imaginary lines suggest four options for placing the center of interest for good composition. Put the interesting things on the lines - but even better, at the intersections of the yellow lines
Here is an illustration of what these imaginary lines would look like. (You can actually buy grids that attach to your camera to help you frame):
Below is an example how to properly frame a landscape picture...and how it should be divided into thirds. (Almost every amatuer photographer will leave too much sky at the top of the image...or not enough).
It should look like this:
1) The horizon is 1/3
2) The center is 1/3
3) The foreground is 1/3
The exception to this rule would be a spectacular sky/clouds/sunrise/sunset. (In other words...the sky really makes the picture). In that case you would want the sky to dominate, and become 2/3's of the photo.
However in this example, along with most landscape photos...the mountains are the focus:
And finally...if the landscape is kinda boring and does'nt really have a focal point....you need to add something it the foreground to make in more interesting.
BUT you need to place it in the right place. Once again use the rule of thirds.
In this example the old shack was placed in the lower left THIRD:
http://www.outdoorshooter.org

Composition continued:
FILL THE FRAME:
Sometimes the background just won't work, or there are elements you really don't desire in the photograph. This is time to fill the frame...
Simply put...you must get closer to the subject, or tightly crop the photo to eliminate unwanted clutter and undesirable content.
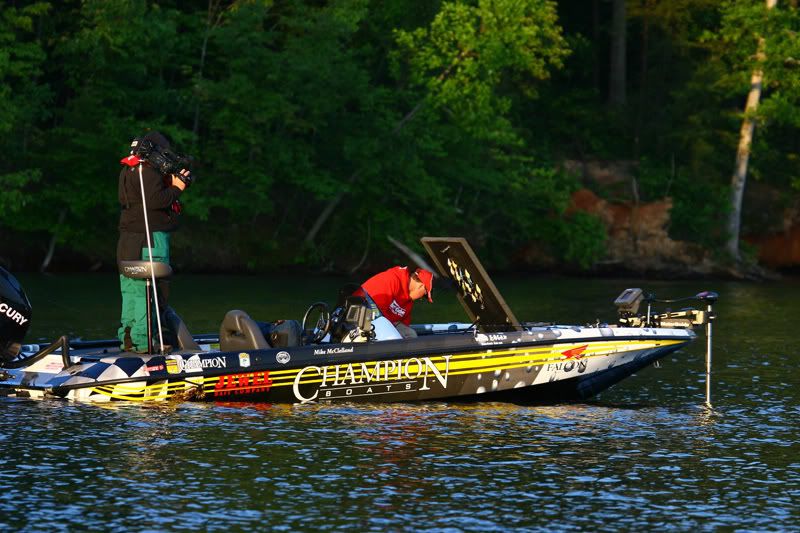
This is'nt the greatest example...but one I could find quickly.
In this first photo I did'nt care for the background...the cameraman is jacking around and not really adding to the photo...and you really can't see what the angler is doing:
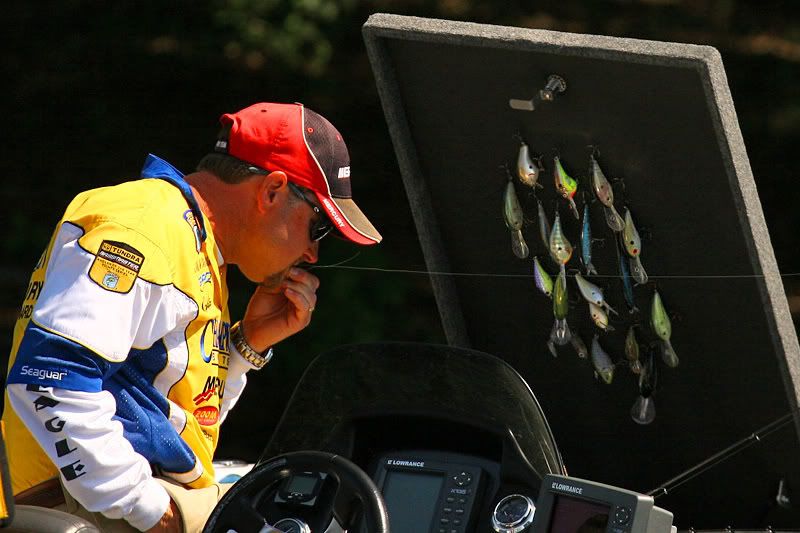
The very next day I had the same guy doing basically the same thing. I did'nt use the photo from the day before in the Photo Gallery, and remembered why I did'nt like it. So I simply zoomed in and came up with this one, which I thought was a bit more interesting....
Composition - 'Go Wide'
Of course this is the polar opposite of 'fill-the-frame'. Everybody wants bigger and longer glass...more and more zoom. We want that one really tight shot...the feather detail...that in-your-face shot.
But wide shots can be just as impressive when you show the quarry in it's natural habitat... doing what it does as a unique creature.
So...if you don't have several thousand dollars to invest in the long, sharp glass...does that mean that you can't be a photographer?!? Come on...there are opportunities out there for you with the equipment you have now.
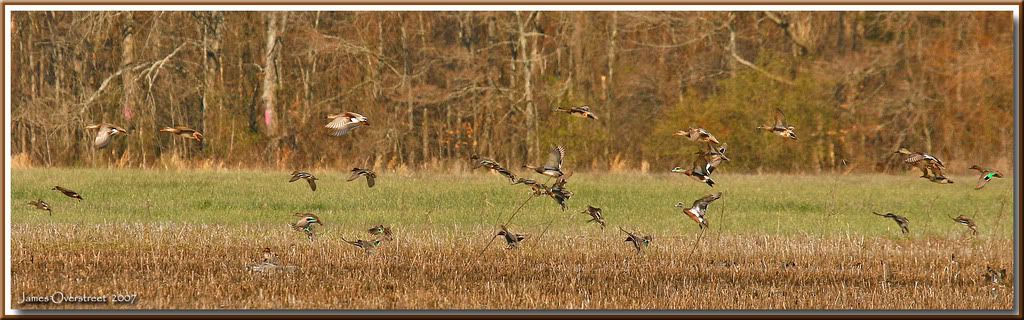
In this first photo....sure I would love to have a super-tight shot of the two drake widgeons on the right side of the image. But then I would have missed the bluewings, greenwings, gadwall, etc...in the photo. AND I would have missed the purple paint on the trees in the background: (I was on the right side of the paint if you'll notice).
And in this second example...don't know about you'll...but I would'nt trade a super-tight shot of any single mallard in this photo...for the one I did manage to get with the wider lens:
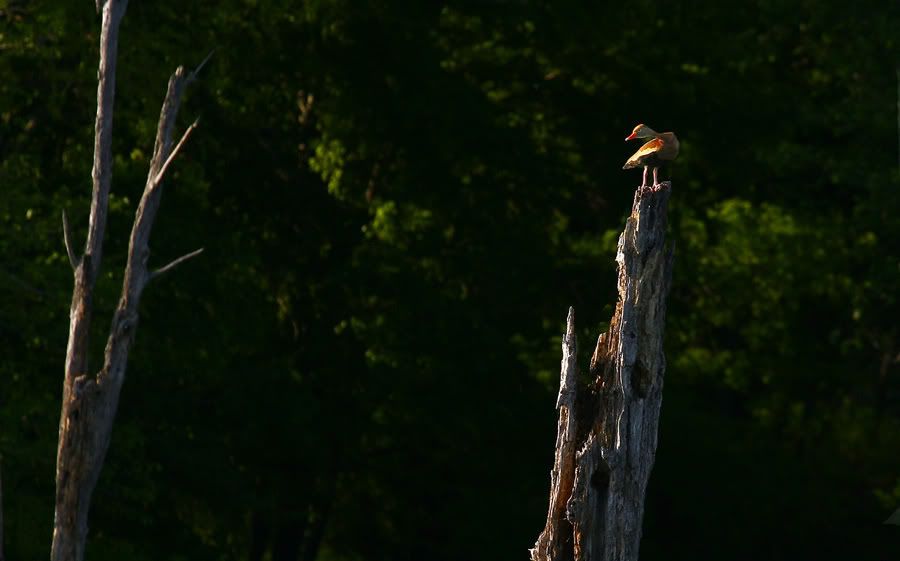
And finally...hey...this is where this whistling duck lives. This is his habitat...and tells a story about his favored environment. I don't need a tight shot to make it work: (And note the rule-of-thirds in the position of the duck).

Composition continued -
'Perspective' (Or at least thats what I call it).
If you're going to take the time to plunge the shutter at a subject...then do it several....SEVERAL times. And try to take the photo from different perspectives.
One of the easiest ways is to take it from a higher or lower vantage point. Matter of fact...make it a point to ALWAYS take the photo of the same scene from a different perspective.
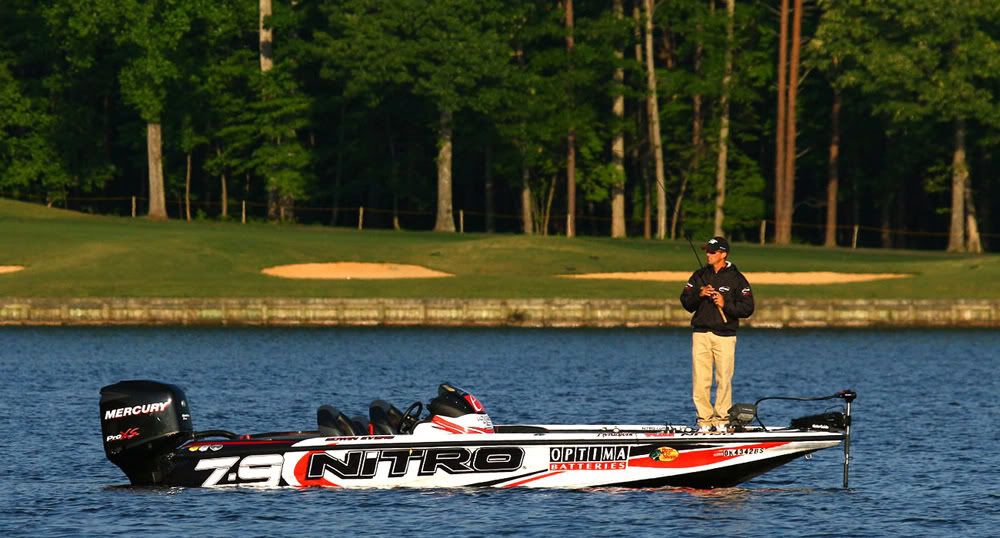
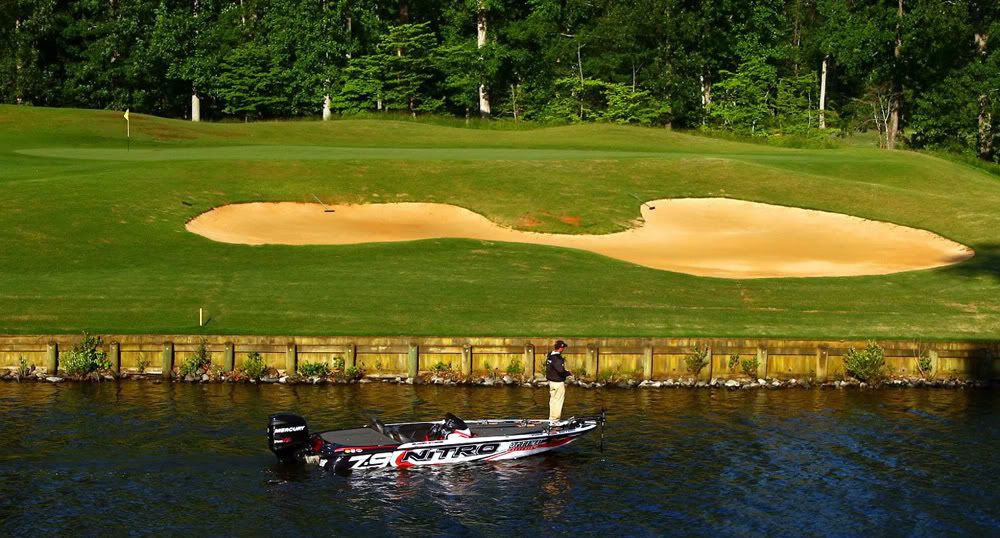
This first one is pretty ho-hum. Guy fishing...take'em all the time. It's what I do. BUT...that golf course is providing one unbelievable background!
Now I'm sitting there in the boat...no fish being caught, so thats out. But I have to get more out of this. I'm looking around...looking around, and then it becomes so simple...
There's an elevated tee-box that will get me high enough to gain a completely different 'perspective' of this scene. Head to the bank...run through the woods...set up.....shoot from a much higher vantage point and get this:
COMPOSITION continued...
Perspective - One last note:
If you want to improve pictures of your children 100%...don't shoot pictures like a looming giant from above.
It's as simple as getting down to their eye level with the camera. (And on this one, note again....'fill the frame')
Here's a pic of my granddaughter....purty aint she?
This is a great rule to adopt in your waterfowl and wildlife photos, too:


Thanks everybody for the kinds words. I'll keep adding to this as I have time. :tu
Lets start taking control of the camera now:
We started with the elements that make up exposure;
* ISO
* Shutter speed
* Aperture.....
Now we have to go deeper for a better understanding of how those three work together, and the influences they have on our photos.
The first step is to settle on a MODE setting on the cameras selection wheel.
These will appears as A, P, TV, AV, M....and several preset modes that I won't discuss, because they are basically point and shoot functions. (Sports, landscape, night, portrait, etc). These are designated by icons.
Most pro and advanced photographers are very familiar with the more advanced MODES, and may use several depending on the desired effect and available light.
So what is the function, or priority of these MODES?
A - Auto: Pretty much what it says. The camera does it all...you just point and shoot.
P - Program Mode: Even professionals will often switch to program mode so they can concentrate on getting the shot instead of worrying over exposure calculations.
Unlike full auto mode, you can usually control flash and a few other VERY important camera settings. One of the most important being EXPOSURE COMPENSATION. (More on this later).
AV - Aperture Priority: Photographer sets the aperture (f-stop) and the camera will couple that setting with a shutter speed to deliver a good exposure.
TV - Shutter Priority: Photographer sets the shutter speed, and the camera will attempt to deliver a good exposure by selecting the appropriate aperture setting.
I should mention...you choose the ISO setting in the P, AV, and TV modes.
Taking control of the camera Part I:
Were past some basics now, so lets delve into how and why we make certain decisions, and how you can begin to get the most out of your digital SLR, by making manual adjustments and choices.
Choosing an ISO setting:
This is one of the first things you should consider everytime you prepare to take a series of photographs. Evaluate the scene and determine the light conditions and the nature of the shot:
Light - Is the subject well lit?
Tripod - Am I use a tripod?
Moving Subject - Is my subject moving or stationary?
Always keeping in mind our original ISO discussion:
* Lower ISO's will slow down your shutter speed, but give you better quality
* Higher ISO's will allow you to shoot higher shutter speeds, but produce noise
So knowing these things, choose the lowest ISO setting that will allow you to reasonably work with the given light.
Along with the available light, you must consider the kind of shot you're taking, and determine if you need faster shutter speeds, or can you get away with slower shutter speeds. (Tripod photos, etc)
The optimum choice is a low ISO setting at all times for better quality photos, but unfortunately we don't always have enough light.
Summary -
* You must always remember how ISO effects shutter speeds.
* Lower light conditions usually call for higher ISO settings
* Brighter scenes or a solid camera rest, will allow lower ISO settings that produce higher quality images.
http://www.outdoorshooter.org
Taking control of the camera Part II - Modes
TV or Shutter Priority mode:
You choose the shutter speed to a specific duration, and the camera adusts the correct aperture for a proper exposure.
With longer exposures (slower shutter speeds), this mode is often chosen as an effect to create predictable motion blur, or when working in low light.
Faster shutter speeds would be chosen when photographing sports or high-speed action, to freeze the action or motion.
Now you can't shoot everything at the fastest shutter speed, or the slowest. You must begin at a reasonable speed dependent upon available light.
In the shutter-priority mode, the aperture value should change when the command-dial is being turned for setting a shutter speed.
However, it is possible that shutter speed changes and the aperture value stays all the same.
This means that the shutter speed is either too high or too low. Therefore, make sure that you will watch the change of both aperture value and shutter speed.
Otherwise, you may easily get over- or under-exposed photographs.
Can lower shutter speeds, used in low light be used to capture photos of moving subjects?
Yes. You can use a technique known as 'panning'. Very similiar to following a duck with the muzzle of your shotgun. Simply begin to follow the subject and 'pan' the camera at the same speed as the subject, while keeping the subject in the frame. Gently plunge the shutter and continue moving the camera as you shoot. It's a great way to display speed and motion.
An example of panning: This boat is going at least 60 miles per hour, just after daylight. This particular photo was taken at 1/40th shutter speed at 640 ISO.
If I would have chosen a fast shutter speed...there would be no background motion blur, and I would have had to have a very high ISO to get a proper exposure:
This is an example of using a very high shutter speed with an insanely bright scene. I was basically shooting directly into the setting sun at 1/8000ths of a second. Any slower and the picture would have been completely blown out:
And finally this is a timed exposure of my home on a snowy night.
Of course this was shot from a tripod with a remote shutter release. The highlights are actually a bit blown out a bit on this one....but will give you an example of using a slow shutter speed and tripod combo, to get a decent exposure in very low light.
Shutter speed was 2 seconds, ISO 100
In a case like this one you would want to take several photos...adjusting the shutter speed as you go. This is the same scene framed a bit differently. Highlights a bit better, ect....and a totally different 'feel'.
ISO 100, 1 second exposure:


Using graduated neutral density filters:
If you decide to get into landscape photography they are invaluable. How many times have you looked through your CF cards, dissapointed and thought, "This is not how I saw this scene?" Your skies look stark with very little detail, while your foreground looks fine. We always need to keep in mind that the camera does not see the range of light the human eye does.
You'll never be able to completely cover all the stops of light from the darker foreground, to the much brighter light posed by the sky/sunsets/sunrises, until you make the move to GND's.
Without the GND's you have to make choices, usually none of them good for the overall image. You can meter the foreground, then end up with a very bright sky that shows little detail in clouds or color. If you meter the sky, you end up with no detail in the shadows in the foreground.
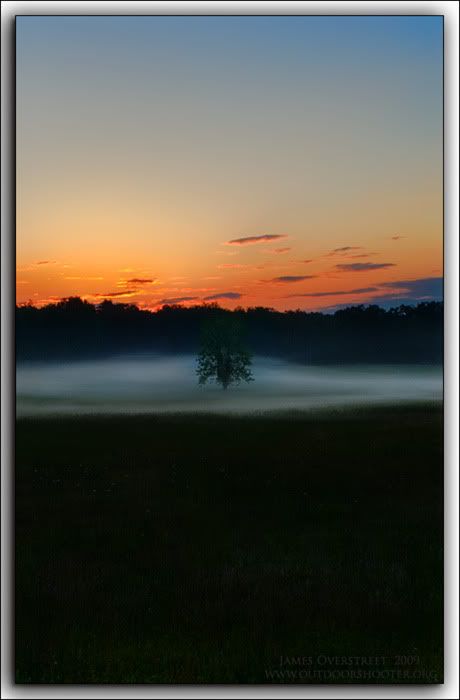
In this first one, which was JUST at dawn, the foreground was barely visible to the naked eye, but the sun rising was 4 stops brighter.
I mounted the 4-stop GND and was able to expose both the foreground and sky. This allowed me to record the scene as seen by the naked eye.
I realize this is'nt the greatest of photos, but without using the filter, those little clouds on the horizon...they would probably be washed out from bright light with very little color or detail. The blue, to red, to yellow in the sky would not appear like it does in this photo.
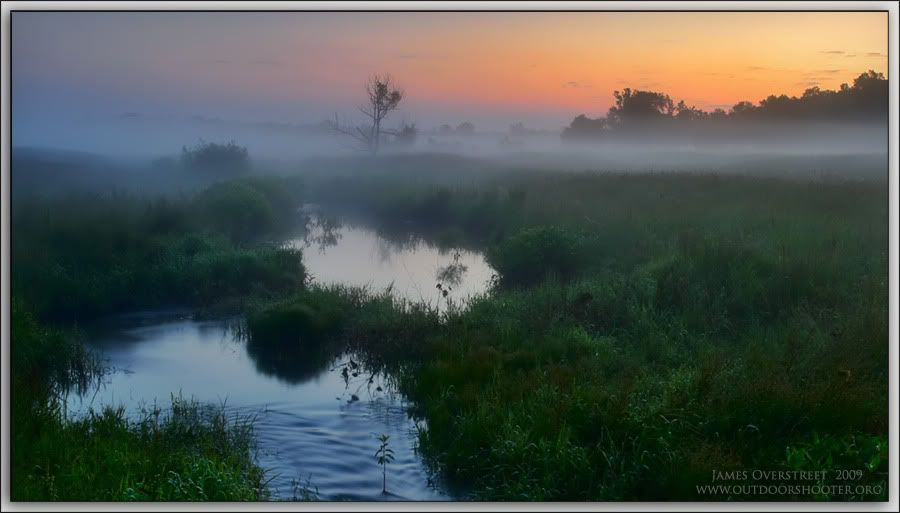
A few minutes later I drove around to this little creek drain in a pasture. The foreground was becoming more visible as dawn turned into early morning. There was now 2 stops difference in the sky and the foreground. Swapped out the 4-stop filter for the 2-stop GND.
How to meter the scene using GND's:
Your first step is to determine the strength of filter you'll need.
The simplest method is to point your camera at the ground and take a meter reading with the ground filling the whole of the frame without the filter in place.
Now repeat this step but this time with the sky filling the frame.
The difference between these two readings will indicate the strength of graduated filter that you need.
Once you've decided on the filter you need, use the meter reading you took from the foreground to take your shot.
